If there’s one lesson I’ve learned after years of baking and decorating, it’s that frosting consistency can make or break a dessert. The right texture — smooth, creamy, and spreadable — transforms your baked bars from homemade to professional. Too thick, and it pulls up crumbs. Too thin, and it slides off like melted butter on a hot pan. Getting it “just right” is the difference between frustration and that glorious, glossy finish you can’t help but photograph.
In this post, I’m sharing all my tips for perfect frosting consistency on baked bars — from the old-school, traditional methods passed down through generations to the pro-chef tricks you see in pastry kitchens. Whether you love rich buttercream, tangy cream cheese frosting, decadent ganache, or quick glazes, this guide will help you master texture, balance, and finish every time.
Frosting Tips: Where Every Baker Starts
Let’s start with the basics — the everyday frosting tips that apply no matter what kind of frosting you’re making. I’ve learned these through trial, error, and more frosting “redos” than I’d like to admit.
1. Temperature Makes All the Difference
Your frosting’s texture is deeply connected to temperature.
If your butter or cream cheese is too cold, you’ll get lumps. If it’s too warm, you’ll end up with greasy frosting that won’t hold its shape.
Sweet spot: between 68–72°F (20–22°C).
At this temperature, butter is soft enough to press a dent with your finger but firm enough to stay structured. That balance creates a frosting that’s smooth, fluffy, and stable on your bars.
2. Sift the Sugar (Always)
This step takes 30 seconds and prevents 30 minutes of regret. Sifting your powdered sugar removes clumps, aerates the mix, and gives your frosting a silky texture that spreads beautifully. It’s the difference between homemade and bakery-smooth.
3. Add Liquid Slowly
Every liquid — milk, cream, even lemon juice — changes your frosting’s consistency. Start with a tablespoon at a time, beat, then check.
Frosting can go from perfect to soupy fast, especially in humid weather.
Pro tip: Use heavy cream instead of milk if you want richness without thinning too much.
4. Whip It Longer Than You Think
Under-mixed frosting feels heavy and flat. Give it air! Whipping for a few minutes incorporates tiny air pockets that make frosting soft and luxurious. I usually beat mine 3–5 minutes until it looks glossy and holds soft peaks.
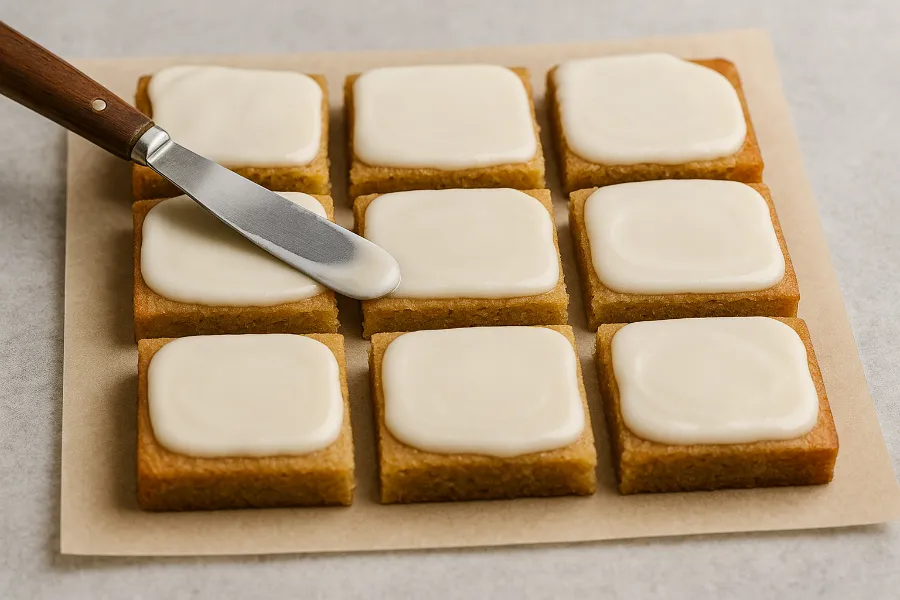
5. Let Baked Bars Cool Completely
I know — it’s tempting to frost warm bars. But patience pays off. Frosting melts and slides off when applied to hot or even warm baked goods.
Cool your baked bars completely, or pop them into the fridge for 20 minutes before spreading. The frosting will stay put and spread like a dream.
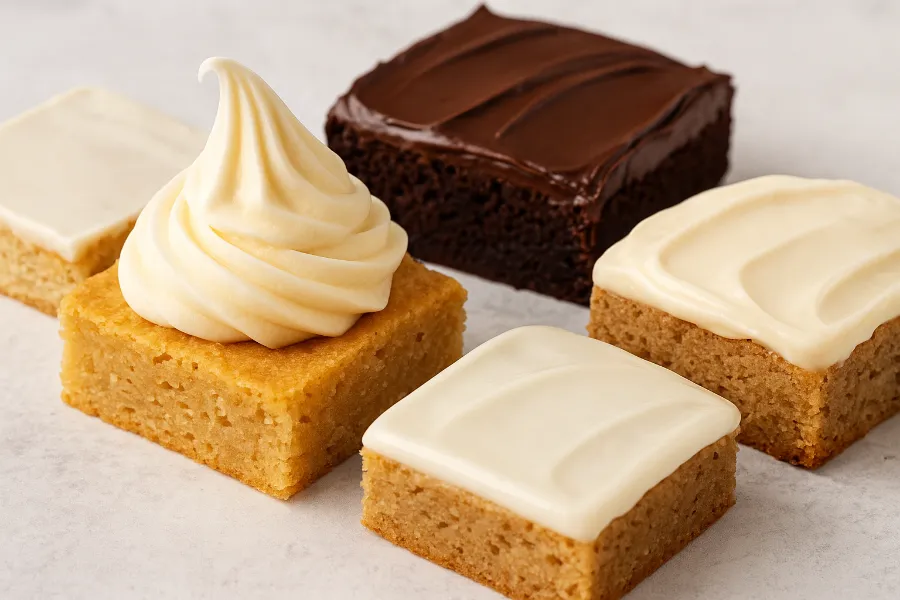
Buttercream Frosting: Classic, Creamy, and Always Reliable
When it comes to achieving perfect frosting consistency, buttercream frosting is the foundation every baker should master. It’s creamy, customizable, and pairs with almost any dessert bar — from blondies to cookie bars to red velvet squares.
Traditional Buttercream
My go-to recipe for a traditional American buttercream is simple:
- 1 cup unsalted butter (softened)
- 3–4 cups powdered sugar (sifted)
- 2–3 tablespoons milk or heavy cream
- 1 teaspoon vanilla extract
Beat the butter until pale and fluffy. Add powdered sugar one cup at a time, alternating with small splashes of cream until the texture is right. You’ll know it’s perfect when it’s thick enough to hold shape but soft enough to spread with ease.
Fixes:
- Too thick? Add milk, one teaspoon at a time.
- Too thin? Add more powdered sugar.
Pro Chef Buttercream
Pro pastry chefs take it up a notch by weighing ingredients instead of measuring by volume. Their golden ratio?
1 part butter : 3 parts powdered sugar.
They also use temperature control tricks — chilling their mixing bowls or swapping to Swiss meringue buttercream, which uses egg whites cooked with sugar for an extra-smooth, stable finish. It’s a bit more work, but it’s worth it if you’re chasing bakery-level perfection.
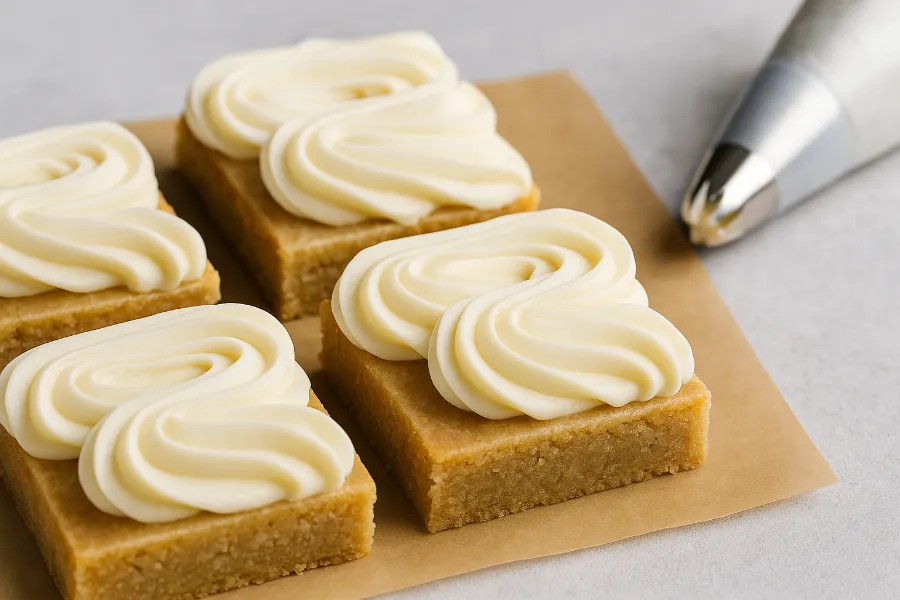
Cream Cheese Frosting: Tangy, Silky, and Crowd-Favorite
If buttercream is the classic, cream cheese frosting is the cult favorite. There’s something about that tangy flavor that pairs perfectly with carrot cake bars, pumpkin bars, or lemon blondies.
The trick is achieving a balance between creamy and stable — and avoiding the dreaded runny texture.
Traditional Cream Cheese Frosting
Here’s my never-fail version:
- 8 oz cream cheese (brick-style, not whipped)
- ½ cup unsalted butter
- 3 cups powdered sugar (sifted)
- 1 teaspoon vanilla extract
Beat the butter and cream cheese together until smooth. Add powdered sugar gradually, then mix on medium speed until creamy and spreadable.
If it’s too soft: Chill it for 10 minutes and rewhip.
If it’s too sweet: Add a pinch of salt — it balances beautifully.
Pro Chef Cream Cheese Frosting
Professional bakers often stabilize their frosting to make it last longer under heat or during transport. Their secrets include:
- Adding 1 tablespoon cornstarch or meringue powder for structure
- Using high-fat cream cheese (low-fat versions release more moisture)
- Mixing on low speed at the end to eliminate air bubbles
The result? A frosting that’s glossy, firm, and pipes like a dream — even in warm kitchens.
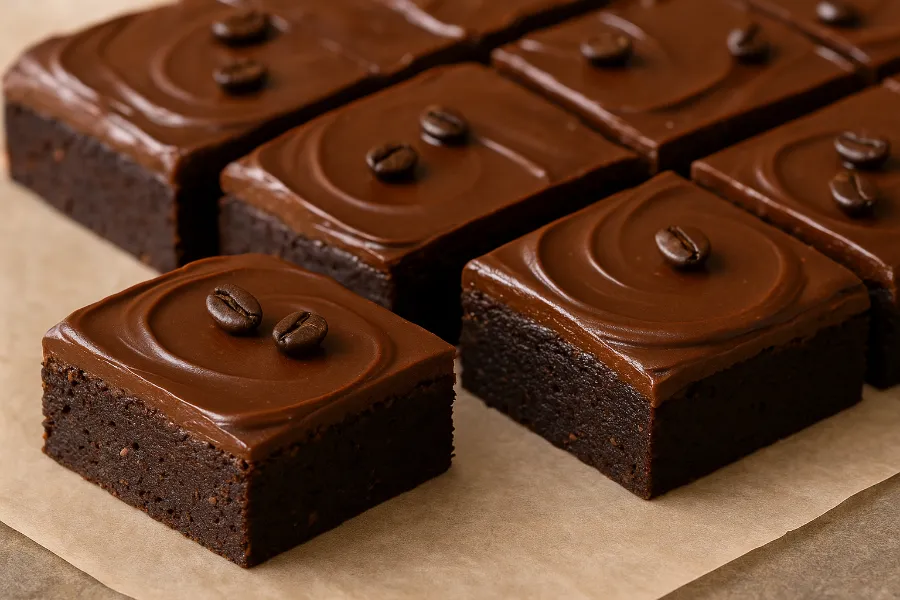
Ganache: The Glossy, Elegant Option
For bakers who love a sleek, polished finish, ganache is your best friend. It’s rich, chocolatey, and effortlessly transforms a simple pan of dessert bars into something that looks straight out of a French pâtisserie.
Classic Ganache Recipe
Ganache is made with just two ingredients: chocolate and cream. But the ratio determines its personality.
- 2:1 chocolate to cream → thick, frosting-like texture
- 1:1 → pourable, glossy glaze
- 3:1 → truffle consistency
To make it:
- Heat cream until steaming (don’t boil).
- Pour over chopped chocolate.
- Let it sit for two minutes, then stir slowly from the center outward.
As it cools, it thickens into a silky frosting that’s perfect for brownies or rich cookie bars.
Pro Chef Ganache Techniques
Chefs love to play with ganache texture. For added shine, they’ll stir in a tablespoon of butter or corn syrup at the end. Some even emulsify it with a hand blender to ensure the smoothest finish possible.
If your ganache ever breaks (looks grainy or oily), don’t panic — whisk in a spoonful of warm milk or cream to bring it back together. Magic.
Dessert Bars: The Ultimate Frosting Canvas
There’s a reason I love frosting dessert bars — they’re the perfect test for your consistency skills. Unlike cakes, which can hide imperfections under layers, bars showcase your frosting front and center.
Here’s how I match frosting types to different baked bars:
| Dessert Bar Type | Best Frosting Match | Texture Goal |
|---|---|---|
| Brownies | Chocolate ganache | Dense + glossy |
| Lemon Bars | Glaze or cream cheese frosting | Tangy + smooth |
| Blondies | Buttercream frosting | Soft + fluffy |
| Carrot Cake Bars | Cream cheese frosting | Creamy + spiced |
| Pumpkin Bars | Cream cheese frosting | Velvety |
| Sugar Cookie Bars | Buttercream | Stable + decorative |
Each frosting behaves differently, but they all rely on the same principle — perfect consistency.
Baked Bars: Cool, Frost, Slice, Repeat
Let’s talk about timing.
The most overlooked step in frosting baked bars is cooling. Even a slightly warm surface can ruin your hard work.
- Cool completely before frosting.
- Spread evenly using an offset spatula or the back of a spoon.
- Chill for 15–30 minutes to let the frosting set before slicing.
- Use a warm knife for clean, bakery-worthy edges.
These small habits make a huge difference in presentation — and in how your frosting holds up.
Dessert Recipes That Show Off Frosting Consistency
Once you master the right texture, you’ll want to show it off. Try these combos to practice your newfound frosting skills:
- Salted Caramel Blondies with whipped buttercream
- Zesty Lemon Bars with cream cheese glaze
- Espresso Brownies with mocha ganache
- Vanilla Bean Sugar Bars with American buttercream
- Maple Walnut Bars with cream cheese frosting
Each recipe highlights how consistency transforms the experience — from the first bite to the last crumb.
Homemade Frosting: The Real Game-Changer
I’ll say it — store-bought frosting can’t compete.
Homemade frosting wins every single time because you control the texture, sweetness, and quality. No stabilizers, no mystery oils, just real ingredients that whip into silky perfection.
Plus, it’s surprisingly forgiving. Once you understand how butter, sugar, and liquid work together, you can tweak any frosting to fit your mood — thicker for stacking, thinner for drizzling, or whipped light for something cloudlike.
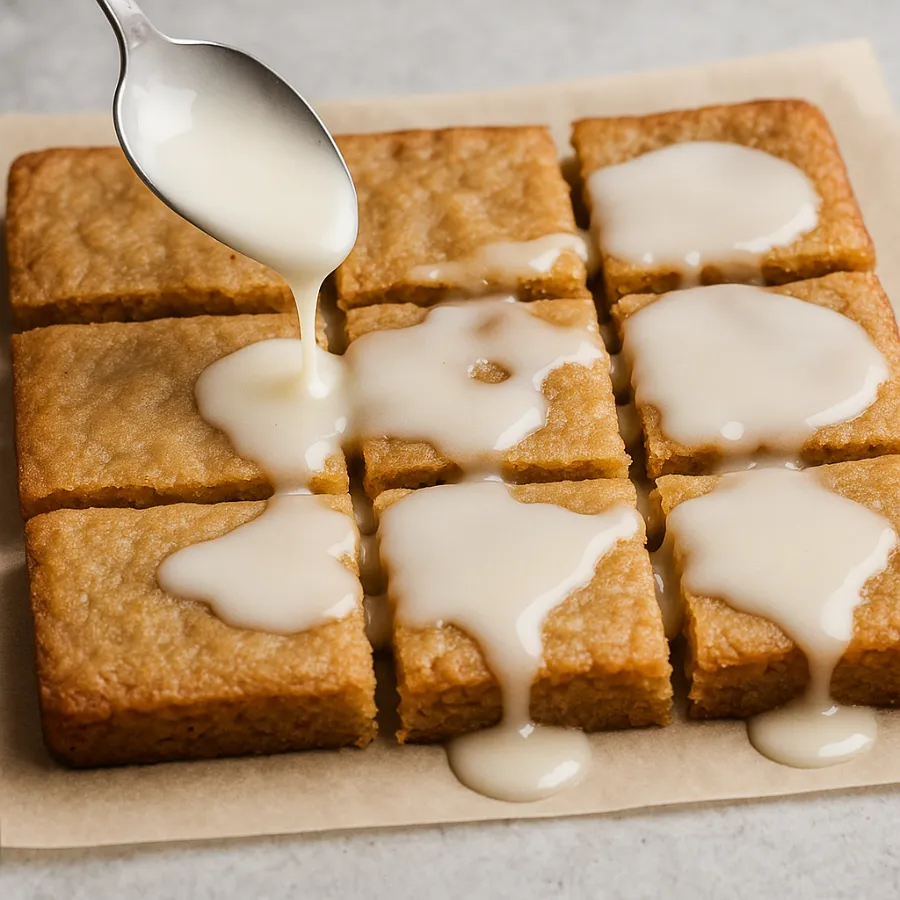
Glaze Recipes: Quick, Shiny, and Perfect for Beginners
Sometimes you don’t want full frosting — just a shiny, sweet drizzle that enhances your bars without overwhelming them. That’s where glaze recipes shine.
Classic Sugar Glaze
- 1 cup powdered sugar
- 2–3 tablespoons milk or lemon juice
- Optional: a touch of vanilla or zest
Whisk until smooth and pourable. The glaze should coat the back of a spoon but still flow easily.
Pro tip: Swap milk for espresso or orange juice for flavor twists, or add ½ teaspoon light corn syrup for a glossy finish.
Pro Chef Glazes
Chefs often tweak glazes with creative liquids — think brown butter glaze for blondies or maple bourbon glaze for spiced bars. They also let glazes rest a few minutes before drizzling to remove air bubbles for a picture-perfect sheen.
Troubleshooting Frosting Consistency Like a Pro
Here’s your quick fix chart for the most common frosting mishaps:
| Issue | Why It Happens | How to Fix It |
|---|---|---|
| Frosting too runny | Too much liquid or heat | Add more powdered sugar, chill 10 mins |
| Frosting too thick | Not enough liquid | Add 1 tsp milk at a time |
| Frosting gritty | Unsifted sugar | Sift and mix longer |
| Frosting oily | Overbeaten or melted butter | Chill briefly and rewhip |
| Frosting melting off bars | Bars too warm | Always frost when fully cooled |
Pro Chef vs. Traditional: Two Paths, Same Goal
Here’s the fun part — you don’t have to choose sides. Traditional frosting methods give you comfort and simplicity; pro techniques give you precision and polish. Combine them.
- From the traditional side, use feel, patience, and intuition.
- From the pro side, use tools, ratios, and temperature control.
Together, they guarantee frosting that’s stable, smooth, and beautiful on any dessert bar.
Final Thoughts: Frosting Consistency Is the Heart of Good Baking
If baking is love, frosting is expression.
It’s where science meets creativity — where temperature, ratios, and texture turn into art.
Once you master frosting consistency, you’ll find yourself adjusting like a pro without thinking: a little more sugar here, a splash of cream there. You’ll feel it in the spoon, see it in the sheen, and know exactly when it’s right.
So next time you bake, take your time with that final layer. Because the frosting doesn’t just sit on top — it finishes the story.
FAQs
Start with room-temperature butter or cream cheese, sift your powdered sugar, and add liquid gradually. Whip the frosting until it’s smooth, fluffy, and easy to spread.
Runny frosting usually happens from too much liquid or warm ingredients. Chill it for 10–15 minutes and add more powdered sugar to thicken.
Add one teaspoon of milk or cream at a time while mixing. Keep adjusting until your frosting becomes soft, spreadable, and holds its shape.
Buttercream or cream cheese frosting work beautifully on most baked bars, while ganache is perfect for rich brownies and dense desserts.
Always let baked bars cool completely before frosting. For warm climates, chill the bars for 15–20 minutes after frosting to set the texture.
Yes! Store frosting in an airtight container in the fridge for up to five days. Rewhip it at room temperature before using to restore consistency.
Glaze is thinner and pourable, giving a shiny finish, while frosting is thicker and more stable. Both rely on balanced sugar, fat, and liquid ratios for the right consistency.