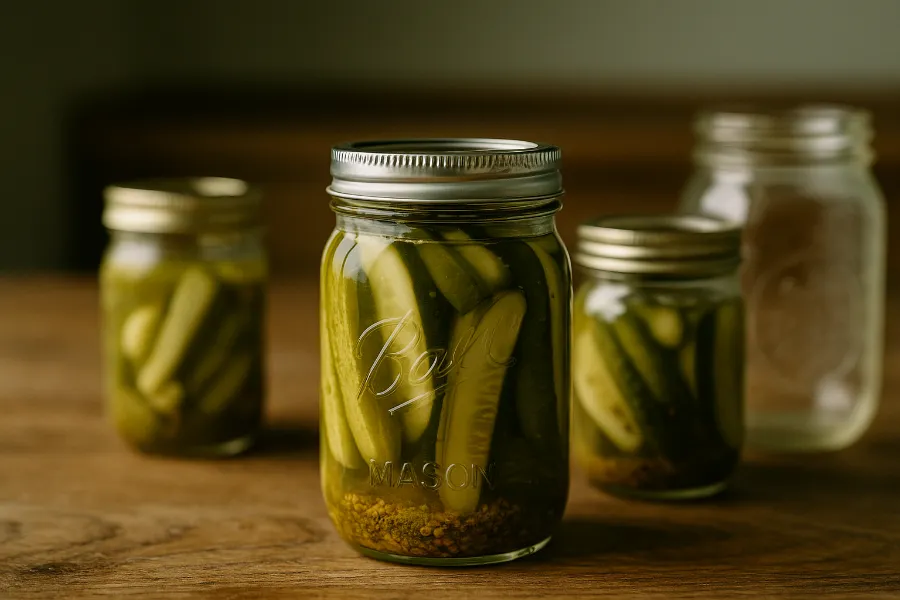
Every summer, as the cucumbers start piling up on my counter and the scent of dill and vinegar fills my kitchen, I find myself coming back to this sweet pickle recipe. It’s one of those traditions that feels like a bridge between generations — the kind of recipe that makes your house smell like home.
I grew up on old-fashioned, syrupy-sweet pickles that were almost candy-like. Delicious, yes, but sometimes a bit heavy. Over time, I learned how to strike that perfect balance between sweet and tangy — crisp, flavorful, and just the right amount of bite. That’s what this post is about: the art of making homemade sweet pickles that taste like your grandmother’s, but fresher, lighter, and better balanced.
Homemade Pickles: Why Making Them Is Worth It

There’s something satisfying about turning a basket of cucumbers into jars of gleaming, golden-green homemade pickles. It’s more than preserving food — it’s preserving time, memories, and flavor.
Store-bought pickles just don’t compare. They’re often too sweet or too flat, missing that lively crunch that only comes from making them yourself. When you craft your own brine, you get to adjust every element the sugar, the spice, the vinegar to fit your taste. And best of all, you get to watch those jars line up like trophies of summer.
Homemade pickles don’t need to be complicated either. With the right steps, even a first-time canner can produce jars that seal perfectly and last all year.
How to Can Sweet Pickles Like a Pro
If you’ve ever wondered how to can sweet pickles, the good news is that it’s simpler than it sounds. You just need patience, precision, and a clean workspace.
Here’s my method that never fails:
- Choose the right cucumbers.
Pickling cucumbers like Kirby or Persian hold up best — they’re firm, small, and perfectly suited for brining. - Soak in salt water and ice.
Combine sliced cucumbers with pickling salt and ice cubes. Let them rest for a few hours to keep them crisp. - Prepare your brine.
Mix vinegar, sugar, and your favorite spices (we’ll dive into that soon). - Pack and pour.
Layer cucumbers in hot, sterilized jars, then pour the hot brine over the top, leaving about ½ inch headspace. - Seal and process.
Wipe rims, screw on lids, and process in a boiling water bath for 10 minutes.
Once sealed, those jars can rest in your pantry for months ready for sandwiches, charcuterie, or straight-from-the-jar snacks.
Pickle Brine Recipe: The Soul of Sweet Pickles

A good pickle brine recipe is where the magic happens. This is what infuses your cucumbers with that perfect balance of sweetness, spice, and tang.
Here’s my go-to base brine for sweet pickles:
- 2 cups white vinegar (5% acidity)
- 1 cup apple cider vinegar
- 1 ¾ cups sugar
- 2 cups water
- 1 tablespoon mustard seeds
- 1 tablespoon celery seeds
- 1 teaspoon turmeric
- 1 teaspoon allspice berries
- 1 teaspoon whole cloves (optional)
Bring everything to a gentle simmer for 5 minutes until the sugar dissolves. You’ll know it’s right when your kitchen smells like a memory — tangy and spiced, but comforting too.
The best thing about making your own brine is that you can adjust it. Love it sweeter? Add a bit more sugar. Prefer more bite? Add another splash of vinegar. It’s yours to customize.
Pickle Spice Blend: Building Layers of Flavor
The key to unforgettable pickles lies in a great pickle spice blend.
This is where you can get creative — where each jar becomes a reflection of your flavor style.
Here’s my favorite combination for a balanced sweet pickle:
- 4 tablespoons mustard seeds
- 4 tablespoons celery seeds
- 2 tablespoons coriander seeds
- 1 tablespoon black peppercorns
- 1 tablespoon allspice berries
- 2 bay leaves, crushed
- ½ teaspoon red pepper flakes (optional)
I keep a small jar of this blend in my pantry all year. For every quart of pickles, I use about 1–2 tablespoons of it. Sometimes I toss in a cinnamon stick or a few slices of fresh ginger when I want something a little different.
Homemade pickling spices don’t just add flavor — they add character. It’s what sets your jars apart from anything store-bought.
How to Make Pickles Crisp and Crunchy
No one wants a limp pickle. One of the questions I get most often is how to make pickles crisp without using additives. The answer is simple — it’s all about your technique.
Here’s how I keep every batch crunchy:
- Use the freshest cucumbers possible. The moment they start to soften, they won’t bounce back.
- Trim the blossom end. That little tip contains enzymes that can make pickles soft.
- Soak in ice water for a few hours. It firms the cucumbers and helps them withstand hot brine.
- Don’t overprocess. Once your jars seal, take them out of the water bath. Too much heat ruins texture.
Some canners swear by adding grape leaves or pickling lime, but honestly, if your cucumbers are fresh and your process is quick, you won’t need them.
Homemade Canning Made Simple
There’s something grounding about homemade canning — that satisfying pop of the jar sealing, the pride of filling your shelves with your own handiwork.
If you’re new to canning, don’t be intimidated. Sweet pickles are one of the easiest ways to start because the acidity of the vinegar does most of the preserving for you.
A few canning essentials:
- A large stockpot or canner with a rack
- Canning jars and lids
- A jar lifter and funnel
- Patience and a towel-covered counter for cooling jars
Once your jars cool and seal, label them with the date and store them in a cool, dark place. They’ll keep for up to a year — though mine rarely last that long before being eaten.

Refrigerator Pickles: For the Quick Craving
Not every pickle has to be canned. When I’m craving something fresh and tangy today, I make refrigerator pickles.
These skip the canning step but still deliver on flavor and crunch.
Here’s how:
- Pack sliced cucumbers and onions into clean jars.
- Pour hot brine over the top, leaving ½ inch space.
- Let cool, then refrigerate.
They’ll be ready in 24 hours and only get better over the next few days. They last about 6–8 weeks in the fridge — perfect for small batches or spontaneous summer snacks.
Water Bath Canning: A Beginner’s Confidence Builder
If you’ve ever wanted to try traditional canning, water bath canning is your best friend. It’s straightforward and doesn’t require any fancy equipment.
Here’s how I do it:
- Fill a large pot with enough water to cover your jars by at least one inch.
- Bring to a boil.
- Carefully lower filled, sealed jars into the pot.
- Process for 10 minutes (adjust for altitude if necessary).
- Remove jars and let them rest for 12–24 hours.
When you hear that satisfying ping, you’ll know they’ve sealed perfectly. It’s one of the best sounds of summer.
Vinegar to Water Ratio: The Safety Secret
When it comes to safe canning, the vinegar to water ratio is non-negotiable.
For pickles, you always want at least equal parts vinegar and water — ideally a 1:1 ratio using vinegar with 5% acidity.
Here’s my golden rule:
Never reduce the vinegar or increase the water in your brine.
You can play with sweetness or spices, but acidity is what keeps your pickles safe on the shelf.
If you ever want a punchier flavor, you can even go 3:2 vinegar to water — but never the other way around.
Sterilizing Jars for Canning Success
Before you start canning, sterilizing jars is one of those non-negotiable steps. It’s not glamorous, but it’s crucial.
Here’s my quick method:
- Wash jars and lids in hot, soapy water.
- Submerge them in boiling water for 10 minutes.
- Set them on a clean towel to air dry.
- Keep them warm until you’re ready to fill (a warm jar is less likely to crack when hot brine hits it).
This one step prevents spoilage and helps every batch stay fresh and safe.
Troubleshooting and Flavor Tweaks
Sometimes, a batch doesn’t go exactly as planned — but that’s part of learning.
- Soft pickles? The cucumbers weren’t fresh enough or the brine was too hot.
- Brine too sour? Add a touch more sugar next time.
- Too sweet? Increase vinegar slightly.
- Cloudy brine? It’s likely just spices like turmeric — perfectly normal.
- Jar didn’t seal? Store it in the fridge and eat those first.
You can also experiment with flavor tweaks — add cinnamon sticks for warmth, red pepper flakes for heat, or dill heads for a hybrid sweet-dill flavor.

Why Sweet Pickles Deserve a Spot in Every Pantry
Sweet pickles have a way of sneaking into every part of a meal. They cut through richness in barbecue, complement creamy potato salads, and add brightness to cheese boards.
But beyond that, they tell a story of family kitchens, garden harvests, and the satisfaction of making something from scratch.
This sweet pickle recipe brings all that together: the balance of sugar and vinegar, the crunch of a well-cured cucumber, and the joy of homemade canning that connects you to simpler times.
So go ahead grab your cucumbers, stir up that brine, and fill those jars. You’ll never go back to store-bought again.
FAQs
Properly canned sweet pickles can last up to one year in a cool, dark place. Once opened, refrigerate and enjoy within two months for best flavor.
Always keep at least a 1:1 vinegar to water ratio using 5% acidity vinegar. This ensures the right balance of flavor and safe acidity for canning.
Use fresh cucumbers, trim off the blossom ends, and soak them in ice water before brining. Avoid overprocessing during the water bath.
Yes! Simply pour hot brine over cucumbers in clean jars, cool them, and refrigerate. They’ll be ready to eat within 24 hours and last 6–8 weeks.
You can reduce sugar slightly for taste, but never alter the vinegar ratio. Maintaining proper acidity keeps your pickles safe and shelf-stable.
Yes. Boil jars for 10 minutes or use a sanitize cycle to kill bacteria and prevent spoilage. Always fill jars while they’re still warm.
A mix of mustard seeds, celery seeds, turmeric, and allspice creates a balanced sweet-tangy flavor. Adjust spices for your personal taste or add heat with red pepper flakes.