When I first discovered grilled chicken brine, it honestly changed how I cook.
I used to think grilling chicken was just about marinades and heat control — until I realized that the secret to truly juicy, tender chicken starts before it ever touches the grill.
That secret is brining.
Now, whether it’s a weeknight dinner or a backyard cookout, I always take a few extra minutes to brine my chicken. Once you taste the difference, you’ll never skip it again.
In this post, I’ll share my favorite brine formula, timing tips, and flavor twists like apple cider brine and peppercorn brine. Plus, I’ll give you my tried-and-true chicken grill tips so your next meal turns out perfectly juicy.
Brining Chicken
When people hear “brining,” they often think of holiday turkeys or complicated recipes. But brining chicken is surprisingly simple — and the payoff is huge.
At its core, brining means soaking meat in a saltwater solution to enhance flavor and moisture. The salt works on a microscopic level to help muscle fibers hold more liquid. That means your chicken stays juicy, even over high grill heat.
Here’s what happens when you brine chicken:
- Salt penetrates deep into the meat, seasoning from the inside out.
- Protein fibers loosen just enough to trap moisture instead of squeezing it out.
- Every bite tastes flavorful, not just the surface.
I used to think it was an “extra” step — now it’s non-negotiable. Once you start brining, even simple grilled chicken tastes richer, juicier, and more forgiving if you overcook it a little.
Brining Chicken for Grill
If you’ve never done it before, here’s exactly how I do brining chicken for grill at home.
No fancy tools, no weird ingredients — just good technique and patience.
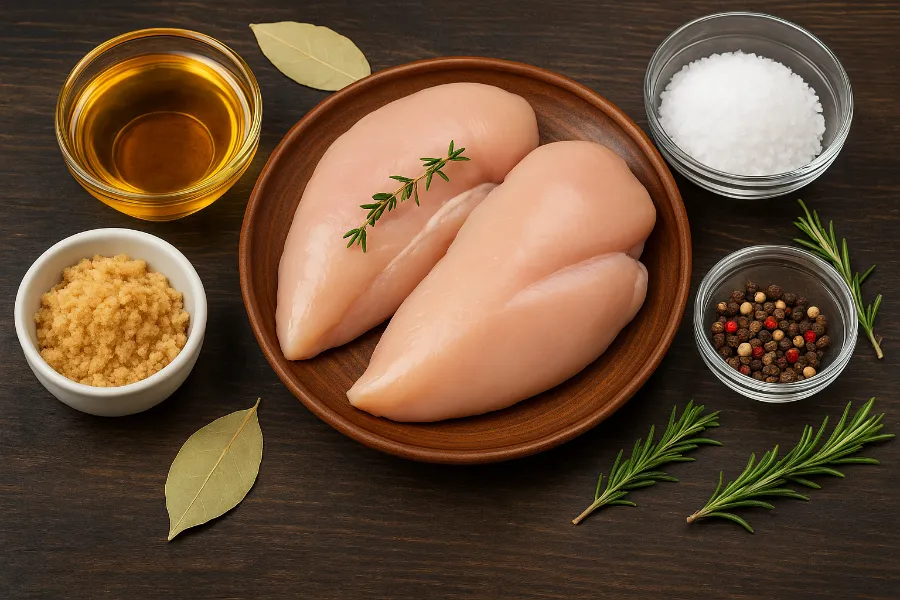
What You’ll Need
- A large non-reactive bowl or container (glass, plastic, or stainless steel)
- Cold water
- Salt (I prefer kosher salt)
- Optional: sugar, herbs, spices, citrus
That’s it! Once you mix your brine, the process is mostly hands-off.
Easy Chicken Brine
Let’s start with the most basic and my personal go-to easy chicken brine.
This version works for everything from boneless breasts to whole birds.
Ingredients:
- 4 cups (1 quart) cold water
- 3 tablespoons kosher salt (or 2 tablespoons table salt)
- 2 tablespoons brown sugar (optional)
- 2 garlic cloves, smashed
- 1 teaspoon peppercorns
How to make it:
- Stir the salt and sugar into the water until fully dissolved.
- Add the garlic and peppercorns.
- Make sure the brine is cool before using.
- Submerge your chicken completely.
- Refrigerate while it soaks.
When time’s up, rinse briefly, pat dry, and grill. You’ll be amazed how much juicier even plain chicken tastes.
Brine Ratio
If you only remember one thing from this post, let it be the brine ratio.
The right balance ensures your chicken absorbs flavor without turning overly salty.
My perfect ratio:
- 4 cups water
- 3 tablespoons kosher salt
- 2 tablespoons brown sugar (optional but adds great browning)
If you use table salt, reduce it slightly because it’s denser.
This simple 4:3 ratio (water to salt) works beautifully for both grilling and roasting. You can double or triple the batch depending on how much chicken you’re brining just keep the proportions consistent.
Apple Cider Brine
When I want something with a hint of sweetness and tang, I go for apple cider brine.
It adds depth and subtle fruitiness, which pairs perfectly with smoky grilled chicken.
Ingredients:
- 2 cups apple cider
- 2 cups cold water
- 3 tablespoons kosher salt
- 2 tablespoons brown sugar
- 1 bay leaf
- 1 teaspoon whole peppercorns
- Optional: a few sprigs of thyme or rosemary
Mix everything until the salt dissolves, then chill completely before adding the chicken.
The natural sugar in the cider helps the meat caramelize beautifully on the grill, giving it that golden-brown color everyone loves.
I use this brine most often for thighs and drumsticks, especially when I’m serving grilled corn or apple slaw on the side.
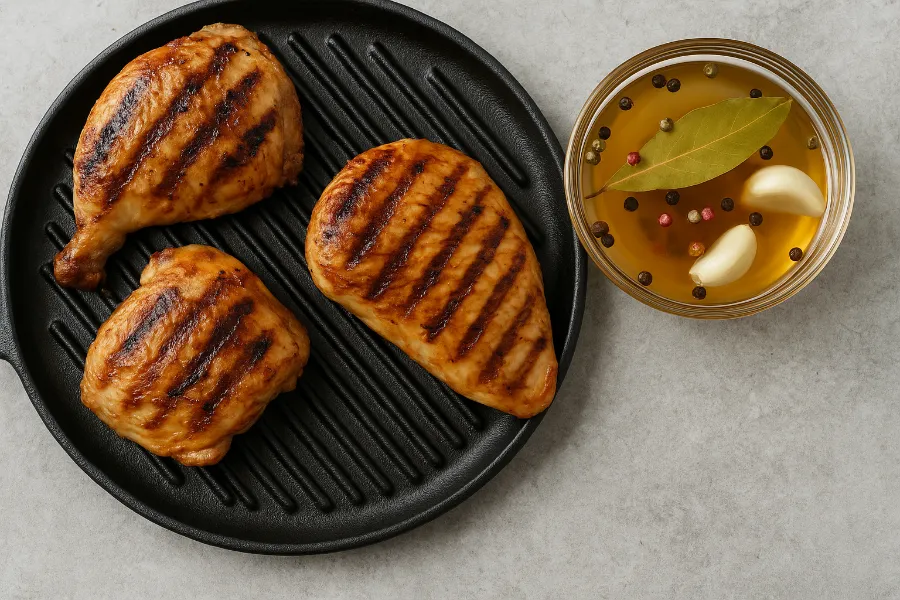
Peppercorn Brine
If you like bold, aromatic flavor with a little heat, a peppercorn brine is my favorite variation.
It’s subtle yet distinctive, and the aroma that hits you while grilling is incredible.
Here’s how I make it:
- 4 cups cold water
- 3 tablespoons kosher salt
- 1 tablespoon whole peppercorns (lightly crushed)
- 3 garlic cloves, smashed
- 2 bay leaves
- Optional: lemon zest or a touch of chili flakes
The crushed peppercorns release flavor slowly as the chicken soaks. When grilled, they lend a mild bite that balances the smoky char perfectly.
This one works especially well for chicken wings or kebabs. I usually serve it with a squeeze of lemon or a drizzle of garlic butter afterward.
Chicken Grill Tips
Brining gives you juicy meat — but grilling it correctly locks in that success.
Over the years, I’ve learned a few chicken grill tips that make all the difference.
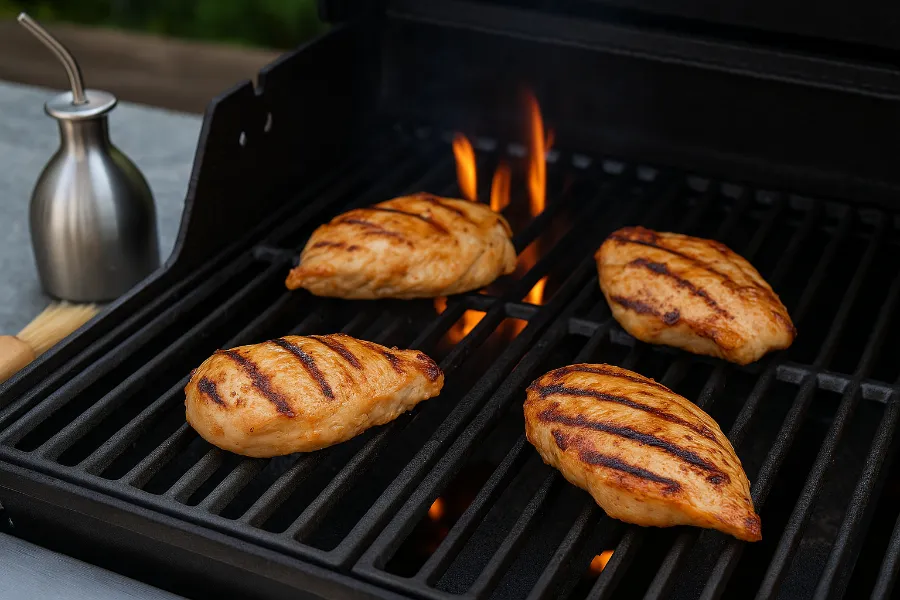
1. Preheat the Grill
Always preheat for at least 10–15 minutes. A hot grill gives you those perfect sear marks and prevents sticking.
2. Oil the Grates
A light coating of oil on the grates helps keep brined chicken from tearing when flipped.
3. Two-Zone Cooking
Set up one side of your grill for direct heat (for searing) and the other for indirect heat (for finishing). Start hot, then move to the cooler side.
4. Don’t Overcook
Use a thermometer instead of guessing.
- Breasts: 165°F (74°C)
- Thighs: 175°F (79°C)
Pull them a few degrees early and let carryover heat finish the job.
5. Let It Rest
Always rest grilled chicken for 5–10 minutes before slicing. This allows juices to redistribute evenly.
6. Don’t Crowd the Grill
Give each piece space. Airflow equals even cooking and better grill marks.
Common Mistakes I’ve Learned to Avoid
I’ve ruined enough chicken to know where things go wrong — and how to fix them.
- Too much salt: Stick to the ratio! More salt doesn’t mean more flavor.
- Over-brining: Leaving it too long can make the texture mushy.
- Skipping the rinse: A quick rinse after brining prevents oversalting.
- Not drying properly: Wet chicken steams, dry chicken sears.
- Using reactive containers: Aluminum or copper can alter flavor — always use glass, plastic, or stainless steel.
- Adding chicken to hot brine: Always cool the brine first, or it’ll start cooking your meat.
These little mistakes are easy to fix once you know what to look for.
My Favorite Brined & Grilled Chicken Recipe
Here’s the one I make most often — it brings everything together.
Ingredients:
- 4 bone-in thighs
- 2 cups apple cider + 2 cups water
- 3 tablespoons kosher salt
- 2 tablespoons brown sugar
- 1 tablespoon peppercorns
- 2 cloves garlic
- 1 bay leaf
- Zest of 1 lemon
Steps:
- Combine all brine ingredients and stir until salt dissolves. Chill completely.
- Add chicken, cover, and refrigerate for 3 hours.
- Rinse briefly and pat dry.
- Preheat grill to medium-high; oil the grates.
- Grill thighs 3–4 minutes per side over direct heat, then move to indirect heat for 8–10 minutes, until internal temp reaches 175°F (79°C).
- Rest for 6 minutes before serving.
It’s smoky, tender, and has that perfect balance of sweet, tangy, and peppery. I love pairing it with grilled vegetables or a cool cucumber salad.
Why Brining Works So Well for Grilled Chicken
Grilling exposes meat to high heat, which can easily dry it out. Brining helps chicken stay moist by giving it a “buffer” of extra liquid inside.
That’s why brined chicken is more forgiving — even if you miss perfect timing, it still tastes juicy and tender.
Plus, the salt and sugar in the brine promote browning. That’s why your brined chicken gets that beautiful golden crust and rich, smoky flavor.
Final Thoughts: Make Brining a Habit
Brining isn’t just for holidays or special occasions it’s a simple step that elevates your everyday grilling.
Once you start, you’ll find that grilled chicken brine becomes second nature.
Whether you prefer a classic salt brine, a sweet-tart apple cider brine, or a spicy peppercorn brine, the key is consistency. Follow the right brine ratio, don’t over-soak, and apply a few solid chicken grill tips.
You’ll end up with juicy, flavorful chicken every time the kind that makes people ask, “How did you make this so good?”
FAQs
For boneless breasts, 1 to 2 hours is enough. Bone-in pieces or a whole chicken need longer — about 4 to 8 hours. Avoid brining more than 12 hours to prevent a salty or soft texture.
Yes, a quick rinse under cold water removes extra surface salt. Pat it dry afterward so the skin crisps nicely on the grill.
Use about 3 tablespoons of kosher salt per 4 cups of water. This balance seasons the meat perfectly without making it too salty.
Absolutely! Brown sugar, garlic, peppercorns, or herbs like thyme and rosemary add depth of flavor. These extras turn a basic brine into something special.
Brining focuses on moisture retention and seasoning the inside, while marinades mainly flavor the surface. For juicy grilled chicken, brining gives more consistent results.
Yes — apple cider brine adds a light sweetness and tang that caramelizes beautifully on the grill. It’s especially great for BBQ or smoked chicken.
Always keep brining chicken refrigerated. Cold temperatures prevent bacteria growth and ensure the meat stays fresh and safe to cook.